
Your Cart is Empty

I was recently inspired be this Ugly Glider No More that’s been floating around pinterest. You can click here if you want to see how she converted her glider into a new stylish chair.
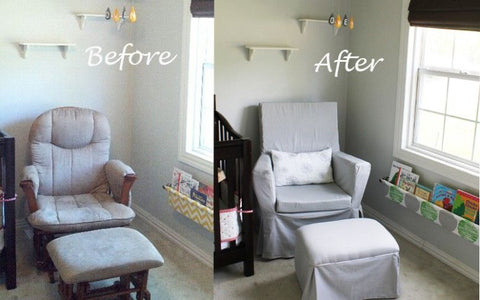
Here is a before and after shot of mine!
I loved this idea for SO many reasons. For one are on a tight budget and definitely do not need to be dropping $500+ for a new fancy nursery chair. Also we are using Jackson’s old dark espresso crib, Isabel’s white changing table, and a bright green wardrobe I will update on later…so I really didn’t want to add in a 4th wood color into our tiny 8 by 13 nursery. The glider we have was one we bought ourselves right before our first baby so we pretty much bought the cheapest one we could find. It never really was super comfortable and it also didn’t have very good back support. One thing that I wanted to do a little differently however was keep the original glider usable and cover the ottoman too. I was not sure if I might want to change it up in the future or convert it back with just new cushions that still showed the original wood so I did not want to use any glue or nails on the wood itself.
With all of that in mind I tried to come up with a cost effective, neutral colored, comfort not spared glider make over. Last week my mom came in for a visit so I was motivated to get started on my project while I had some extra help. (Not to mention she is always helping me with my projects over the phone when I get stumped or need a second opinion ) I ordered some 100% cotton solid grey twill fabric for $8.00/yard over at TexasSusannie.com to make a slip cover to go over the chair once we reshaped it. I ended up using almost 5 yards (60″ width) for my glider slip cover, ottoman, and seat cushion.

Here is a before shot of the chair stripped down without any of the cushions. 
My mom and me got 1 and 3/4 yards of 3 inch thick foam from Joann Fabric Store to use as the new cushion and form for the chair. If you get this at Joann Fabric they almost always have a 40% off coupon.
Or I have located the same foam here on Amazon (affiliate link)

We measured out the width and depth we would need for the seat cushion first. If you have an electric knife they are PERFECT for cutting foam. I however do not have one so we used serrated kitchen knifes. For the back of the chair we measured how tall we wanted it and then traced out the wood in the back of it with a black sharpie. Luckily for us it was already the perfect width so we did not have to trim it at the top at all we just trimmed in on both sides once it got down to the arms. We wanted the foam to be flat in the back so we cut into the foam about the depth of the wood and then wedged it it. It could not have worked more perfectly. The foam does not budge and the back is flat!

 It worked well to have one person sit in the chair and push back really hard while the other person pulls the foam back into place.

We used the same concept for the arm rests. Traced the shape of the arms and cut it out as deep as the wood is on your glider.

At first we had the seat cushion coming out at the front of the chair, but I really wanted a slip cover that went under the seat cushion and a separate cover for the cushion so we trimmed off the edges that stuck out and made two foam pieces that went straight down from the arm rest to the seat. (you can see what I am talking about if you compare the seat cushion in the pics above and below. We also used a couple scrap pieces and stuffed them under the arm rests to give it some firmness for the slip cover to not look baggy. The arms had a few separate pieces so we got a piece of felt and stapled it in to the bottom of the seat pulled it over the arms and stapled into the under side of the chair.
Here is what it looks like uncovered.

For the slip cover I used some extra material I had and made a cover partly to practice so I wouldn’t mess up and have to order more of the grey, but also because I thought it might be nice to at least have something left on so the foam is not all exposed for when I need to throw the outer cover in the wash. I measured each section without the seat cushion in and added 1/4 inch for my seam allowance. I didn’t worry about a skirt for the scrap cover.

Here are the shapes I cut out for the cover. The funny shapes that slightly resemble the state of Idaho go down the side of the back and extended to the sides of the arms. The pieces directly in from those cover the top of the arm rests and the inside of the arm rest. The other pieces seem pretty self explanatory. Then as I said with the practice slip cover I sewed them together with a 1/4 inch seam allowance.

The kids were very excited to test it out in EVERY stage of the process  I then measured how far it was from the slip cover to the floor (plus about 1 1/2 -2″ for a hem) and added on a skirt with box pleats so that it could still glide.

For the cushion I just sewed on a fitted cover with an invisible zipper in the back so that it could be removed for easy washing.Lastly I added an accent pillow for extra back support and to give it that final touch! If your chair does not have an ottoman then you are done! If it does then keep reading and I will explain how I recovered it too.
To recover the ottoman I flipped it over and removed the old cover by taking the staples out with a flat head screw driver and pliers.
I then used that fabric piece to cut the exact same size one from my grey fabric. I pulled it tight on each end and stapled it into the wood and then did the opposite sides. I saved the corners for last to keep the fabric as smooth as possible. You could stop here if you are ok with the feet being exposed and it would look something like this.  I really wanted the style to match the glider though so I made a skirt with box pleats and added some homemade piping in the same fabric as my accent pillow. I had some red cord from a previous project on hand but you could also use a couple of rounded shoe laces or something else you might find with a similar shape. Then I cut about 2 inches of my accent fabric. I had to sew two pieces together length wise so it would be long enough to go around.
Put your rounded string inside of your accent fabric as shown.Then it works best to use a piping foot or regular zipper foot on your sewing machine so you can get the seam as close to the piping as possible. I couldn’t find mine so I just had to do the best I could with my invisible zipper foot.When your done it should look something like this.I then measured the entire distance around the outside on my ottoman plus about 4 inches for each box pleat. For a box pleat I just folded the fabric under on both sides as shown above. You can make a bigger pleat by folding more fabric. I measured the exact length of fabric I would need to go around the under side of the ottoman including the box pleats and then sewed the piping on.
I also hemmed it before putting it on because I planned to staple it to the underside of the ottoman and didn’t want to do it by hand.
I used a staple gun to put it on. This process was a little tricky because you have to have your fabric the exact length and pleats in the exact corners so it is a perfect fit. I just pinned my corners in place so I could make sure I didn’t get off track while stapling. Once it is stapled flip it right side up and your done! Here is one more shot of the finished product.

Comments will be approved before showing up.


Nan Gallets
February 10, 2020
Thank you so much for this great tutorial! I just got a “naked” (wood only, no cushions at all) from the free pile at the landfill. It’s in great shape but I want to be able to use it by my fireplace and I LOVE your idea and the square back and skirt and the upholstered look. Your chair looks astonishingly great!!! Hopefully all I will have to buy is the foam, I think I may have enough fabric already, so this is very budget friendly for me. You are awesome for sharing your great idea and skill! Thanks again!